An image taken by Warren Banfield in July 1983 showing a Melbourne bound Harris EMU waiting to depart and T383 in the yard with a suburban goods train at Lilydale. Image courtesy of the Victorian Railways.Net website which can be found here.
Early in 2024, I set out to build a medium-sized HO scale layout based on a busy suburban terminus in outer Melbourne. I made good progress at first. I built the benchwork, laid the track, and worked on the hard bits like the wiring and installing the point motors. After a good period of troubleshooting, I finally had an operating layout.
And that’s when the momentum stopped.
Between my hectic work schedule and a major decision we've made to move back to the North Island in a few years' time to be closer to family, the inspiration to work on the layout disappeared. My layout was built to be permanent. Every hour of additional work felt like effort that would eventually be torn up, stored, or binned. I was left with a layout that was too big, a move in the future, and a deep sense of "what’s the point?" It felt defeatist because I knew many modellers would enjoy having that space, but for me, it wasn’t working anymore. The inspiration was gone.
The turning point came in 2025 while I was writing a post
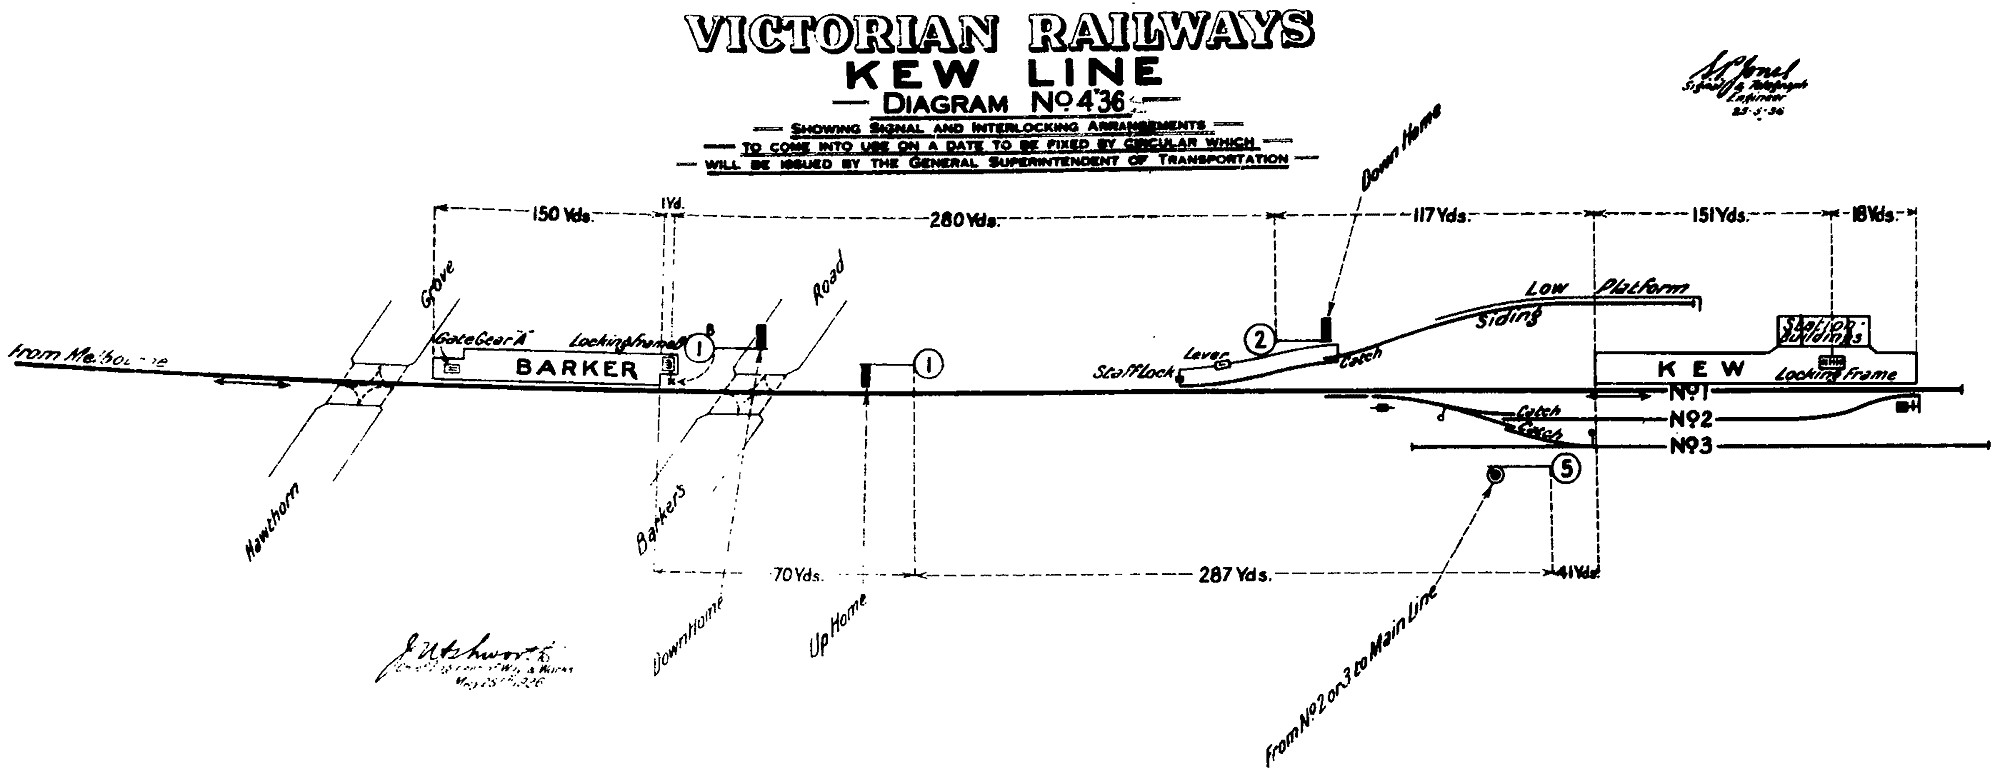
about the history of the Kew railway line. Though the real-world branch closed
in 1957, the more I researched, the more I realised what a great little layout it
would make. It had everything I was looking for: character, a
manageable footprint, electric suburban operations, and enough operational
potential to keep me entertained for a quick 30 minute operating session at the end of a busy workday.
One night, I began to explore the idea of a Kew-inspired layout, and that’s where Levendale came from. Levendale is a play on my street name, Leven, and "dale" is a homage to one of my favourite railway photographs of a Harris electric multiple unit and a T-class hauled suburban goods train at Lilydale.
While Kew provided the initial spark, photo's from the excellent website, Victorian Railways.Net provided the inspiration I needed to get the project started.

I also found inspiration for the new layout in a few other places; Corey Green’s Victorian East ‘Metclafe Station and Workshops’, Jason Wood’s NSW based ‘The Escarpment’ and Alex Malijevic’s ‘Carlingford’. I also took a lot of inspiration from Phil Overton’s books which provided lots of tips for building a good layout.
The priority for this new project is to make the layout simple to build and to get trains running quickly without too many hassles. To ensure portability, I have decided to build it across three modules, each measuring 480 mm by 1200 mm. These modules will bolt together and have removable legs, making the entire setup semi-permanent and easy to move.
Two modules will
contain the station, yard, and a street scene with an overbridge to disguise
the entry into the three-track staging yard on the third module. To maximize
staging and fit the upcoming Auscision four-car Harris electric multiple unit,
the first point for the staging yard will be hidden under the overbridge. The
yard layout itself is based off the original Kew station yard with a main line, a runaround loop and a dead-end goods siding with a backshunt. A crossover provides access to the loop, which will also feature its own
short backshunt for parking a guards van during shunting.


Another similar plan from the Free Track Plans website which you find here.
For the trackwork, I am sticking with Peco Code 100 with Electrofrog medium radius points. I know Code 83 would look more prototypical, but since this is a semi-permanent layout, I want the track to be bombproof. Electrofrog points are harder to wire than Insulfrogs, but since I use DCC and want to run short-wheelbase shunting locomotives in the future, they're a no-brainer for reliable operation.
The electrical side of the hobby can be frustrating when
locomotives stutter or point motors fail to work properly, so my goal is to
make the wiring as robust and accessible as possible. I want a tidy
installation that doesn't require me working beneath the layout at
weird angles to fix wiring issues. The layout will use the NCE Power Cab DCC
system I already own; since there will only be a maximum of three trains on the
layout at once, it has more than enough power. To control the points, I will
use Peco point motors and accessory switches to change the frog polarity. While
I have some Tortoise motors on hand, I want to mimic a lever frame on the
station platform using Peco lever switches. These switches simulate the
movement of a real lever and provide a satisfyingly loud click as the points
flick over. To increase playability, the points will only be operable after
unlocking a switch or possessing a train staff.
While the scenery is still under consideration, the station area and street scene with the overbridge are already locked in. I imagine a path leading down from the street to the platform and station, complete with a grassy bank, a fence at the top, and some low-relief structures depicting the rear of buildings. The backscene will incorporate city backdrops to create a sense of depth. Finally, a kit of Kew station, which I already have, will take pride of place on the platform.
This project has truly excited me, and I am
looking forward to beginning construction shortly.


.jpg)
.jpg)
.jpg)
.jpg)
.jpg)


.jpg)
.jpg)
(1).jpg)